
Find your bottle & cage fit
Choose bottles, cages and mounts that work with your bike.
A bottle should be easy to reach, secure on the bike and simple to drink from. Getting that right starts with the space on your frame, then the cage and bottle you put in it.
Whether you ride a road bike, a full-suspension mountain bike, an e-bike or a daily commuter, this guide will help you choose a setup that fits. We’ll also cover specialist hydration for aero bikes and triathlon, plus ways to carry tools alongside your water.
Start with the bike: will it fit?
Look for a pair of threaded holes on the frame, often with bolts already fitted. These are bottle cage mounts, sometimes called bosses. You’ll usually find them on the down tube, which runs from the front of the bike towards the pedals, or the seat tube below the saddle.
A conventional cage bolts onto this pair of mounts. Standard bottle cage holes are spaced 64mm apart, measured centre to centre. Use the fittings and tightening instructions specified for your bike and cage; matching the hole spacing alone doesn’t guarantee every combination will fit.
A bike without these mounts can still carry a bottle. Strap-on adapters and other mounting positions are covered below.
Three checks before you buy
1. Mount to bike
Does the cage or adapter fit the available mounting points? Check any frame-specific spacers, bolt lengths and restrictions, particularly around e-bike batteries.
2. Bottle to holder
Most conventional cycling bottles share a roughly 74mm body diameter and fit standard cages across brands and capacities. Everyday drinks bottles, shaped aero bottles and magnetic systems can need a different holder.
3. Space to use it
Check the bottle’s height and the space needed to pull it out. Allow for frame bags, cables, batteries and rear shocks, including the space taken up as the suspension moves.
On a tight frame, a shorter bottle or side-loading cage may solve the problem. Don’t assume that a larger frame size or an e-bike label tells you what fits: check your particular bike.
Choose a cage you can reach
A regular top-loading cage lets you lift the bottle out along its length. It’s a straightforward choice when there is plenty of room above the bottle, with options in aluminium, reinforced plastic and carbon.
A side-loading cage lets you withdraw the bottle at an angle from one side, reducing the overhead clearance you need. It’s especially useful on full-suspension mountain bikes and e-bikes where a shock or battery leaves less space, as well as smaller frames and bikes carrying a frame bag.
The bottle still needs room to sit securely and move past the frame. Side loading improves access; it cannot make a bottle fit into a space that is too small.
Left or right loading? Check the mounting position
For the fixed left- and right-loading cages discussed here, the name describes access when fitted inside the frame on the down tube. Move the same cage to the seat tube and the access side reverses. Left and right mean your left and right when sitting on the bike facing forwards.
| Cage version | On the down tube | On the seat tube |
|---|
| Right-loading | Bottle comes out to your right | Bottle comes out to your left |
|---|
| Left-loading | Bottle comes out to your left | Bottle comes out to your right |
|---|
For right-hand access to both frame bottles, this normally means a right-loading cage on the down tube and a left-loading cage on the seat tube. Trek Side Load and Specialized Zee Cage II offer handed options. Some cages are reversible instead: check the model’s fitting instructions before ordering.
Material, grip and colour
Aluminium
A practical starting point for everyday riding, with straightforward designs and a wide choice of finishes. Judge the fit and grip of the particular cage rather than material alone.
Reinforced plastic or composite
Often a useful balance of price, weight and shaped bottle retention. “Composite” does not automatically mean a full carbon-fibre cage.
Carbon
Worth considering if low weight matters to your build. Check the actual weight and access design: a higher price won’t fix poor clearance or an awkward reach.
Choose secure retention for rough surfaces, then check you can remove and replace the bottle comfortably. Once the fit is right, colour is an easy way to match your frame or add a contrast. Compare the actual finish as well as the colour name.
Choose the bottle around your ride
Most conventional cycling bottles are made to fit a standard bottle cage, using a body diameter of around 74mm. A 500ml bottle and an 800ml bottle will generally fit the same cage, so you can choose your capacity without needing a different-sized holder. Bottles and cages from different brands are usually compatible.
The shaped indent around the bottle gives the cage’s retaining lip or tab somewhere to engage. Together with the cage’s grip around the body and support beneath the base, this helps keep the bottle secure over bumps. Small differences in bottle shape and cage design mean some combinations feel firmer or release more easily than others.
Larger-capacity bottles usually gain height while keeping essentially the same cage-fitting dimensions. Choose between 500ml, 620ml, 750ml and 800ml according to how much water you want to carry, then check there is room above the cage to fit and remove the bottle. Specialist aero bottles and systems such as Fidlock have their own fitting arrangements, covered below.
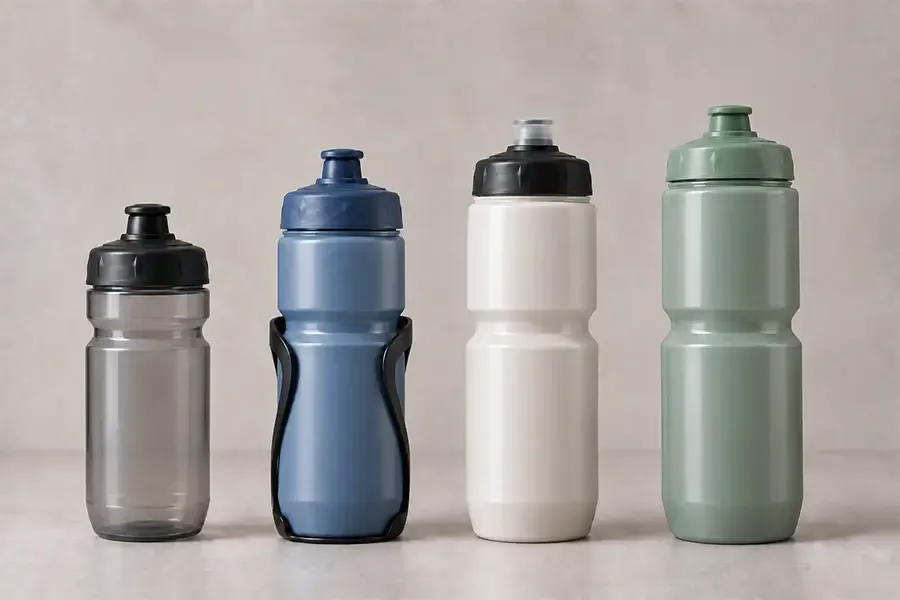
What to look for
- Capacity and clearance: choose enough water between refills, then check there is room in your frame for the bottle’s height and removal.
- Cage fit: standard cycling bottles are broadly interchangeable. Look for a secure hold with a smooth, manageable release.
- Handling: look for an easy grip and a drinking action you find comfortable.
- Care: consider how easily the lid and valve come apart for cleaning, and whether replacements are available.
Fluid ounces to millilitres
Some bottles list capacity in fluid ounces (fl oz) rather than millilitres (ml). This table uses US fluid ounces, as used for the CamelBak and Fox sizes shown in the range. UK imperial fluid ounces are different.
| US fluid ounces | Approximate millilitres |
|---|
| 15 fl oz | 444ml |
|---|
| 21 fl oz | 621ml |
|---|
| 25 fl oz | 739ml |
|---|
| 32 fl oz | 946ml |
|---|
Figures are approximate, rounded to the nearest millilitre. Brands may round their stated capacities differently: a 21 fl oz bottle may be labelled 620ml, for example. Use the manufacturer’s stated capacity for the particular bottle. Fluid ounces measure volume, not the bottle’s weight.
Mouthpieces and flow
A traditional pull-up mouthpiece is simple: open it to drink, then push it closed. A self-sealing valve can make drinking from a squeeze bottle easier without having to open and close a conventional spout each time. CamelBak Podium is one example, with a separate lockout for transport.
Think about flow, how easy the bottle is to squeeze, and whether you want a dirt cover for muddy riding. Straw and bite-valve arrangements suit some specialist hydration systems, but bring extra parts to clean. A wide filling opening helps when adding drink mix or getting a bottle brush inside.
Is an insulated bottle worthwhile?
An insulated cycling bottle slows temperature change, making it useful when you want your drink to stay cooler for longer. CamelBak Podium Chill and Cube Thermo are examples in the range. Check the capacity and outside dimensions: insulation can take up space that would otherwise hold water.
Everyday insulated steel bottles are a different proposition. Being listed alongside cycling bottles does not mean they fit a standard cage, and rigid bottles do not squeeze like soft cycling bottles. Match the bottle, holder and drinking method to how you intend to use it.
Fidlock: carrying a bottle without a cage
Fidlock TWIST replaces the surrounding cage with a base on the bike and a matching connector on the bottle. Magnets guide the connection into place, while a mechanical lock holds it securely. A twisting movement releases it.
This can be useful where lifting a bottle out of a regular cage is awkward. You still need room for the bottle itself and the release movement, so check the bottle dimensions or the manufacturer’s fitting template against your frame.
Uprise’s range includes TWIST bottle combinations in 450ml, 590ml and 800ml. The bolt-on Bike Base uses bottle cage mounts; the strap-on Uni Base provides an alternative for suitable tubes without those mounts.
Buy the right parts together
- Starting from scratch: look for a bottle set that includes the connector and the base you need.
- Bottle plus connector: check whether a bike base is included or sold separately.
- Replacement bottle only: do not assume it includes either the connector or the base.
- Using another bottle: a TWIST Uni Connector can hold suitable bottles within its specified size limits; an ordinary bottle will not attach directly to a TWIST base.
Aero bottles and triathlon hydration
Specialist hydration systems change the bottle’s shape or position to suit the bike and riding position. Start with mounting compatibility and how you will drink or refill, then consider aerodynamic benefits.
An aero frame bottle uses a shaped bottle and matching holder. Profile Design RZ3 and Trek RSL Aero are examples in the range. Check whether the holder accepts other bottles: Trek’s RSL Aero cage also accepts standard round bottles, but that is not a feature to assume across all aero systems.
Between the arms
Systems such as Profile Design FC and HSA place hydration between the aero extensions, often with a drinking tube. Check extension spacing and shape, mounting hardware, computer clearance and access to the refill opening.
Behind the saddle
Rear carriers can add bottle positions when frame space is limited. Check saddle-rail shape and size, the carrier’s approved fit and bottle retention. Allow room for a saddle bag and any moving parts.
Frame-specific systems
Some aero bikes use dedicated bottles or fittings. Match the exact bike and system, and check whether you are buying a complete setup or a replacement bottle. Similar appearance is not proof of compatibility.
A useful setup is one you can reach, refill and clean without a struggle. Consider how you will replace bottles during an event, and don’t assume a claimed aerodynamic benefit transfers unchanged to every bike or riding position.

No mounts, or not enough room?
There are ways to move a bottle or add a mounting position without changing the frame. Choose the adapter for the tube or fittings it will attach to, then check the complete setup with a full bottle.
- Strap-on or clamp-on mounts: options such as SKS Anywhere and Elite VIP use suitable frame tubes instead of existing bosses. Check tube dimensions, shape and frame-maker approval, particularly on carbon.
- Position adapters: a Passport Cage Mover or SKS Cage Shifter can help reposition a cage around a frame bag or other obstruction. Check how far the particular adapter moves it.
- Handlebar or saddle mounts: useful alternative positions where supported by the mount and bike. Check clamp or rail compatibility, steering clearance and reach.
Keep mounts clear of cables, battery access and moving parts. Use the specified bolts and tightening limits, and never drill a frame to add a bottle position. If the fit is uncertain, bring the bike in so we can help check it.
Your bottle mounts can carry more than water
The same mounting area can help carry repair essentials. Some accessories share the mounts with a bottle cage; others take the place of the bottle or cage. Decide how much water space you can spare before choosing storage.
With a bottle
- A compatible mini-pump bracket can sit beneath the cage and hold a pump alongside it.
- Topeak’s Cage Side Mount provides an attachment option for suitable pumps or tools.
- Compatible Topeak Ninja Master+ cages can carry matching tool accessories beneath the bottle. Check what the package includes.
Instead of a bottle
A tool bottle or Topeak CagePack sits in a compatible cage and uses that bottle position for repair kit. Fidlock’s TWIST Toolbox attaches to a matching TWIST base. These are useful ways to free up pockets, but you’ll need another place for your water.
Some e-bike range extenders also use the bottle-mount area. These need the exact battery and mounting system approved for the bike; a standard cage is not automatically suitable. Check remaining bottle space before adding accessories.
For shared mounts, follow the accessory instructions for bolt length, thread engagement and clearance. Extra layers under a cage can change the fit. Replacement lids, connectors and mounting parts should match the exact bottle or system.
Keep it clean and secure
Rinse bottles after each ride and clean them promptly after using drink mix. Take apart lids, valves and straws only as the maker instructs, wash the accessible parts and let everything dry before storing.
Dishwasher suitability and temperature limits vary by bottle and lid. Follow the instructions for your model rather than treating every plastic bottle the same. Check cages, mounting bolts and magnetic-system latches regularly, and replace damaged parts or a bottle that no longer sits securely.
Bottles and cages: your questions answered
Can I use a normal drinks bottle in a bike cage?
Only if it fits securely. Many cycling bottles are designed around a roughly 74mm diameter, while shop-bought water bottles and everyday flasks vary widely. An adjustable cage or suitable adapter may help, but check the bottle cannot bounce out or slide through.
Should I choose a smaller bottle or a side-loading cage?
First check whether the bottle fits inside the frame at all. If it fits but there is not enough room to lift it out, a side-loading cage may help. If the bottle itself clashes with the frame, shock or bag, a shorter bottle or a different position is the better starting point.
Will a bottle cage fit every size of the same bike?
Not necessarily. Smaller sizes can have less space, and suspension layouts or battery arrangements may differ. Check the frame size you own with the intended bottle and cage, including the space needed to remove the bottle.
Can I fit a cage underneath the down tube?
Use that position only where the bike maker provides or approves suitable mounts. Check tyre and mudguard clearance, including suspension movement, and use secure bottle retention. The bottle will be more exposed to spray and dirt, so a covered mouthpiece can be useful.
How do I know whether a replacement Fidlock bottle is enough?
Read the included-parts list. A replacement bottle may require you to transfer an existing connector, while a bottle-and-connector package may still omit the frame base. Match the replacement to your existing TWIST parts rather than choosing by capacity alone.
Find your next bottle setup
Start with the space on your bike, choose a bottle you can use comfortably, then match the cage or mounting system. Explore the range below, or ask the Uprise team if you need help checking a particular fit.